How to use Azure Databricks Managed MLflow in Nussknacker Cloud
This blogpost is a companion to “How to train and register ML models in Azure Databricks”. Here, we show you how to integrate your Nussknacker Cloud account with the ML model trained and registered as described in the companion blogpost, and then use it in a credit card fraud detection scenario. Alternatively, you can follow along this blogpost with your own ML model.
---------------------------
MLflow is the open-source, industry-standard solution for ML model versioning, tracking, and lifecycle management. Nussknacker Cloud already provides excellent integration with models registered in MLflow, as described in the blogposts: Real-Time ML-Driven Recommendations and ML models inference in fraud detection.
In this blogpost, we explore how to integrate your Nussknacker Cloud account with Azure Databricks, a popular platform for collaborative data science and machine learning, and we demonstrate how Nussknacker simplifies the process of inferring models registered in Azure Databricks managed MLflow, making it both easy and intuitive. We assume you already have your ML model trained and registered in Azure Databricks managed MLflow, and you want to use it for inference in your Nussknacker scenarios.
As an example ML model, we use a simple decision tree classifier trained on a Kaggle dataset of credit card fraud data. The model was registered in Azure Databricks as “credit-card-fraud-classifier” (version 1).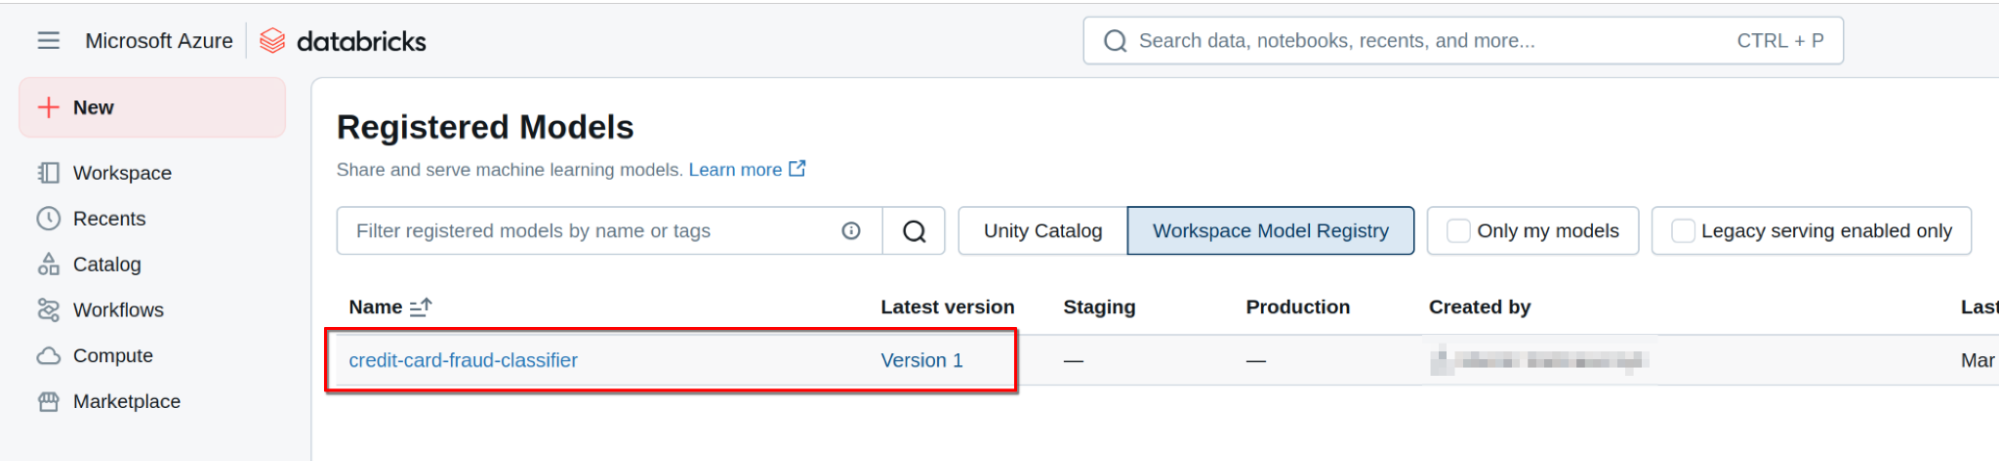
You can explore the full training and registration process of this model in this post How to train and register ML models in Azure Databricks
Exposing ML models registered in Azure Databricks
The first step is to expose the Azure Databricks MLflow Model Registry externally, enabling Nussknacker to communicate with it and access its registered ML models.
Note the Azure Databricks Service URL
In the Overview section of your Azure Databricks Service, note down the provided URL. It will be needed later when configuring Nussknacker integration.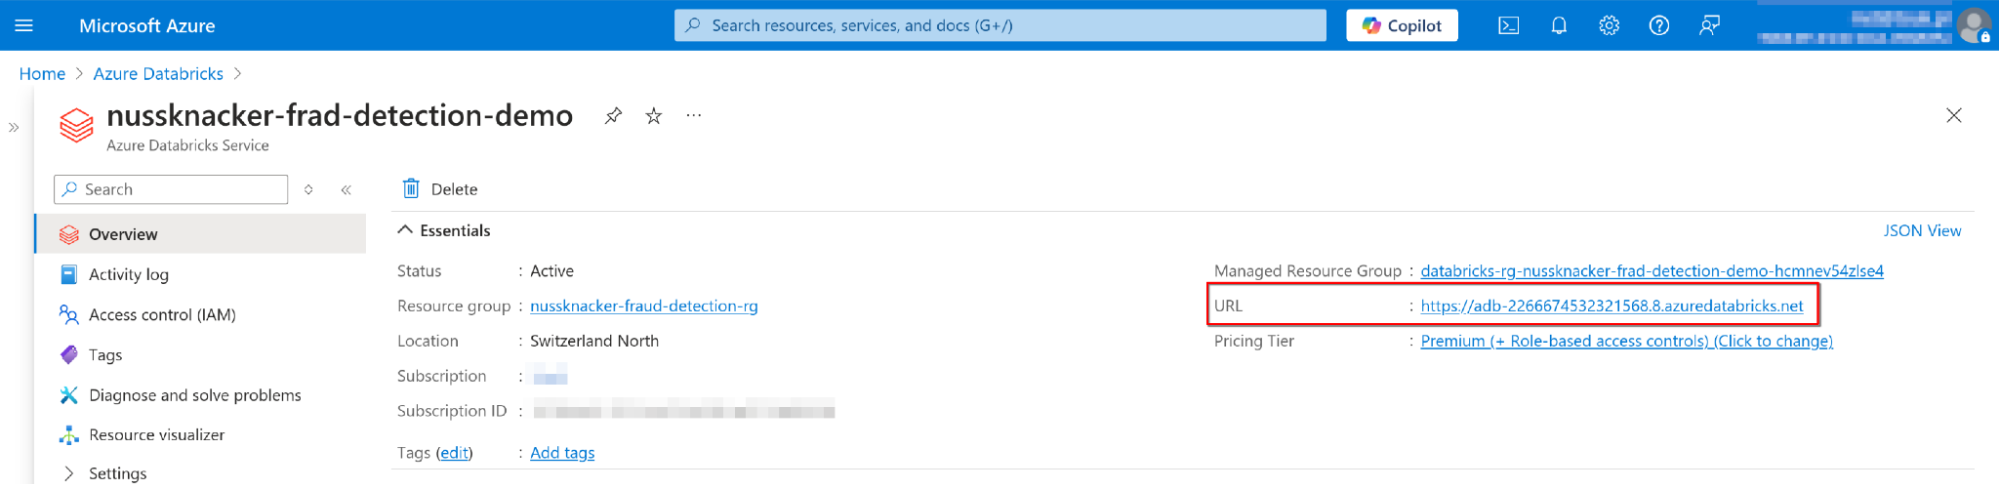
Set Up Service Principals and Secrets
- Inside your Azure Databricks workspace, click on your user icon in the top-right corner and select ”Settings".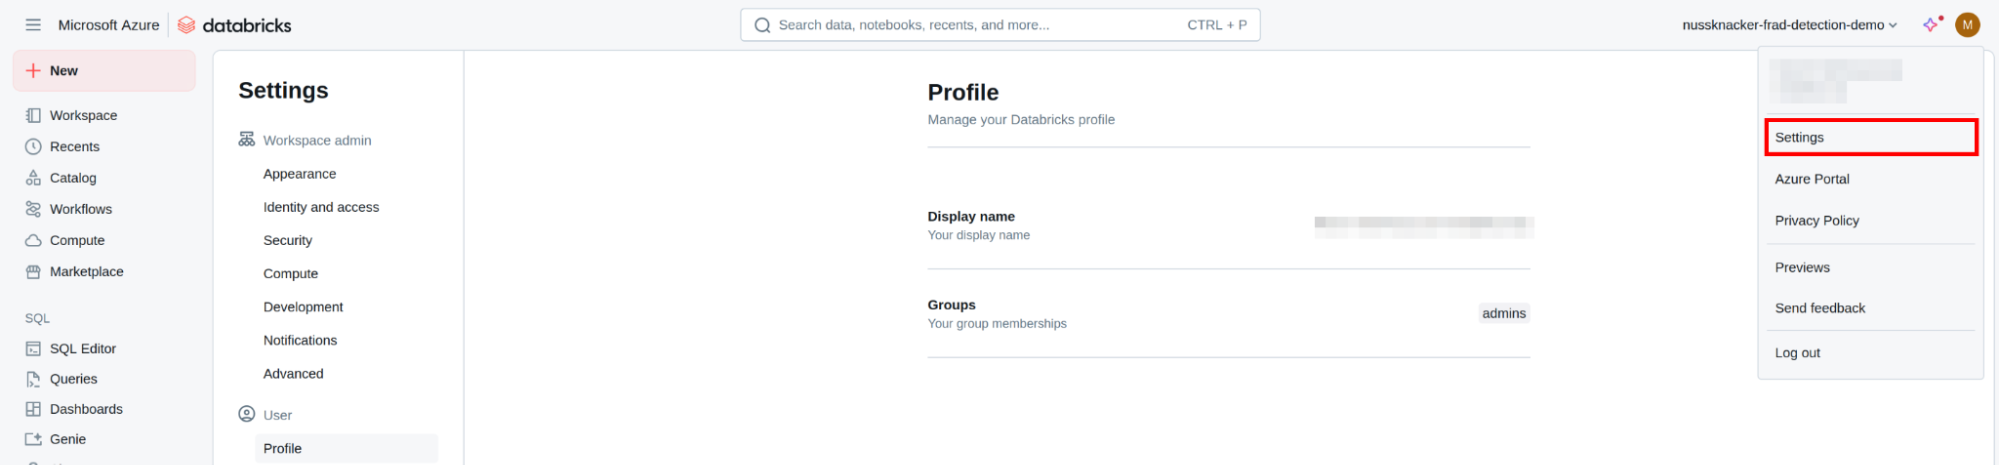
- Navigate to "Identity and access".
- Click the "Manage" button in the "Service principals" section.
- Click "Add Service Principal" and "Add new" in the modal window.
- Choose "Databricks Managed", provide a name (e.g., "nu-cloud"), and click "Add".
- Click on the newly created service principal's name.
- Pick the "Allow unrestricted cluster creation" option and click "Update".
- Navigate to the "Secrets" tab and click "Generate New Secret". Specify the desired lifetime for the new secret and then click "Generate".
- Copy the generated "Client ID" and "Secret" values and store them securely.
Grant View Permission to your workspace
- Navigate to Workspace in the left-hand menu and select the "Workspace" icon in the “Workspace” view.
- Click the Share button in the top-left corner of the page.
- In the "Type to add multiple users, groups or service principal" field, enter the service principal name (e.g., "nu-cloud") that you created earlier.
- Set the permission level to "Can View", then click the "Add" button.
- Close the sharing modal to finalize the changes.
Grant Read Permission to the registered ML model
- In the left-hand menu inside your Azure Databricks workspace, navigate to "Models" under the "Machine Learning" section and select your ML model.
- Click the "Permissions" button in the top-right corner of the model's page.
- In the "Select user, group, and service principal..." field, enter the service principal name (e.g., "nu-cloud") that you created earlier.
- Set the permission level to "Can Read" and then click "Add".
- Save the changes by clicking the "Save" button.
The Azure Databricks MLflow model registry and the registered ML model are now accessible for read operations from outside the Azure Databricks platform.
Configuring Azure Databricks MLflow Integration in Nussknacker
The next step is to configure Nussknacker to access the Azure Databricks managed MLflow and provide components for inferring registered ML models.
Open the Integrations tab in your Nu Cloud account, locate the “MLflow” card, and click the “Add New” button.
Fill out the integration form with the following information:
- Name: enter the identifier for the ML component that will be used within Nussknacker to refer to your model.
- Server URL: this is the URL from the "Overview" section of your Azure Databricks Service.
- Token URL: append the `/oidc/v1/token` to the Server URL, forming the complete Token URL needed for authentication.
- Client ID: this is the "Client ID" saved when we created the Service Principal in Azure.
- Client Secret: this is the "Secret" saved when we created the Service Principal in Azure.
- Scope: set this to "all-apis".
Make sure that Nussknacker can successfully connect to the Azure Databricks managed MLflow using the provided configuration by clicking the “Check Connection” button. If the connection is successful, apply the configuration by clicking the “Submit” button. The MLflow component that provides access to ML models registered in the configured Azure Databricks managed MLflow is now available for use in your Nussknacker scenarios, simplifying ML model integration into your data processing flows.
Using Azure Databricks MLflow Integration
The configured integration with Azure Databricks managed MLflow is available as a dedicated component located under the Enrichers section in the Creator Panel of a Nussknacker Cloud scenario. The component’s name consists of an uppercase “Name” provided during the Integration configuration, followed by the “ML Model” suffix.
After dragging the ML component onto the scenario creation panel and double-clicking it, you will be presented with a configuration form in which you can select a desired ML model (out of the models that you registered in Azure Databricks MLflow) by specifying its name and its version. Our example model was registered as “credit-card-fraud-classifier” with version 1, and therefore, this is the model we chose to select.
Having selected the appropriate model, the configuration form will be populated with input fields for the model input parameters. Each field has a label with a name of the model’s input parameter and its expected data type - this is the place in which you configure the bindings for your ML model input parameters.
For our example, we created a simple credit card fraud detection demo scenario in which the ML model is directly connected to the Kafka source, providing transaction events with fields mapping directly to the model’s input parameters.
In more realistic scenarios, these events could be part of much more complex pipelines before reaching the ML model.
The output of the ML model is bound to a variable name specified in the “Output variable name” field.
This variable is used to access the ML model’s outputs by their names, as specified in the model’s signature during its registration in Azure Databricks.
In our demo scenario, the output from the ML model, i.e., the decision whether a given transaction is fraudulent or not, is used to forward the transaction event to the appropriate Kafka Sink topic, which contains either accepted or blocked transactions.
This event forwarding is performed by the Filter component, which uses the ML model’s credit card fraud prediction obtained from the model’s named output parameter. 
Final thoughts
Nussknacker Cloud makes it very easy to integrate with ML models registered in Azure Databricks managed MLflow. The process is very straightforward, and the registered ML models appear as regular enricher components, ready to be used for inference at any place in your Nussknacker scenarios.